The technical section of this guide has two parts – first I’m going to explain how to build a functional, Bandcamp-like website using a software called Faircamp. Second, we’re going to put the website we’ve made online using a hosting platform called Neocities.
I think this is a pretty good “first website” project. The example site I’m using today – the site I made for my band RECALL – is my first successful website, after many vague and incomplete attempts to do so throughout my life. The fact that the scope is already pre-defined (your band’s releases) makes it more manageable. Assuming you have all your materials gathered, you can probably do all this on a Sunday afternoon.
If you are already a “computer person” or someone who tinkers with static sites, I will just direct you to Faircamp’s excellent documentation – you will probably be able to figure it out from there! There are also links to a few other tutorials here, here, here,), which might help if the way I’m explaining it isn’t doing it for you. Y’a même un tutoriel en français si ça vous tente!
Faircamp is a Static Site Generator, which is a piece of software that you download and run on your computer that’ll take all your music files, images and information and spit out some new files that constitute a nice-looking and functional website. You can then take your website files and host them (aka “put them on the internet”) wherever you want. Compared to dynamic websites, which are very prevalent on the modern internet, static sites are very lightweight – they’re cheap to run, are more environmentally friendly, and they load better on poor internet connections (which increases accessibility). the-counterforce.org is a static site, built with a different static site generator called Eleventy. Static sites are very punk!
Back to Faircamp – heres my example Faircamp site that I’m using for this tutorial, that I built for my band Recall: https://recall.rocks
Here's some more examples: Street Gloves • Demo Fest 2025 • Like Weeds
As you can see, we have basic bandcamp-like functionality – a little description of the band, links to all the places to find us, and a few releases you can listen to or download. Each release has it’s own page with more information, lyrics, etc.
In this tutorial I'll be showing how to use it to make a simple page for a single band/artist, but you can also make a "label" style page for many artists (like the Demo Fest page or Likeweeds.org). There's a bit more resources about how to do that closer to the end.
We’ll walk through the process of building this site together, and when we’re done you’ll have your own site just like this that YOU own and can put wherever you want online. Let’s get started!
The first step is to gather and organize all your files and info. You’ll need the audio files for the music, the artwork, and the text bits like a short description of your band, liner notes, release credits and lyrics, plus any links to sites where people buy physical releases or merch, or other places to listen to the music or watch videos, etc. You can just dump all the text and links into your text editor or word processor of choice – we’ll be putting this info into a format that Faircamp can read a bit later, but it’s really helpful to have it all in one place before we start.
We’re going to put all this stuff into folder that are organized in a particular way.
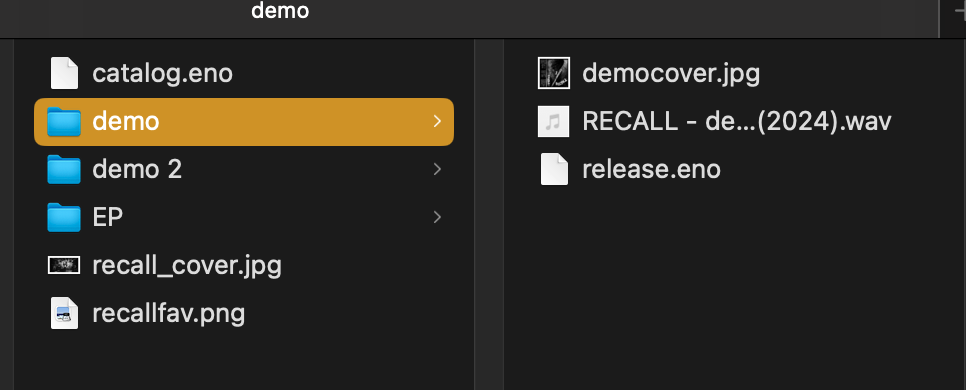
Inside the RECALL folder, right click to create a new folder for your first release – for us it’s called “Demo 2024”. Drag and drop these files into Demo 2024:
Repeat this process for the rest of the releases, until you have a subfolder for each release which contains music, artwork and text, all nested inside your main folder.
Go to neocities.org and sign up for an account. Like I mentioned, they have a free tier, but to host the type of stuff we want to, you will need a paid supporter account so go ahead and set that up (or you can wait until a few steps later to drop the actual $, but tbh if you got your files together you’ve done most of the hard part).
If you already have a Neocities account/site, or if you’re sharing a paid account between multiple bands or projects, go to the dropdown menu in the top right corner > Settings > and add new accounts under “Your Sites.”
There is a lot of fun stuff you can do with Neocities... maybe that will be it’s own guide ;)
Next, we’re going to download a code editing program, which isn’t strictly necessary but I’ve found it helped me wrap my head around things – you can edit your files and see your folder structure at the same time.
If you already have one you like, use it! If not I liked using Sublime Text for MacOS and I believe it's available for Windows too. Your linux distro might already have one built in.
Go to the Faircamp downloads page and follow the instructions for your particular operating system:
https://simonrepp.com/faircamp/download.html
If you’re on Windows you can just download the program from the site above.
If you’re on a Mac, there’s a little extra stuff we get to do in the terminal, lucky you.
Open Terminal (go to the magnifying glass icon in the top right corner of your screen and just type “terminal” and hit enter).
First we have to install something called Homebrew. Type this into your terminal:
/bin/bash -c "$(curl -fsSL https://raw.githubusercontent.com/Homebrew/install/HEAD/install.sh)"
follow the instructions in the terminal to install homebrew. Once it's done and your cursor is back, type
brew install faircamp
follow the instructions to install faircamp.
For Linux, it will depend on which distro you are using. Faircamp is available for NixOS and in the Arch AUR, and there are packages you can download and install yourself for Debian/Mint/Ubuntu/elementary or Fedora on the Faircamp download page.
Remember when I mentioned that we were gonna format our text (liner notes, lyrics, links, descriptions, etc) so that Faircamp can read them? That’s our next step.
Open your code editor program (the one we downloaded in the preliminary section). Then, go up to File > Open and select the main folder we made in the first step (in our case, this folder is called “Recall”). Your code editor should display the folder off to the side, with all your little release subfolders nested inside.
Go up to the menu and select File > New File. Name this new file “catalog.eno” and if it’s not already, make sure this file is in your main folder (in my example, “recall”), not any of the subfolders. This file is called our “Catalog Manifest”, and it’s basically a text file full of instructions that Faircamp will use to build our site.
In your code editor, click on your catalog.eno file to open it, and paste in the following text:
title: RECALL

base_url: https://recall.rocks

language: en

favicon: recallfav.png


home_image:

description = a black and white photo of the band recall playing on a stage

file = recall_cover.jpg


feeds:

- generic_rss

- podcast_rss


release_downloads:

- mp3


link:

label = Email

url = mailto:recall514@gmail.com


link:

label = Bandcamp

url = https://recall514.bandcamp.com/album/demo-2024


link:

label = 7" on 11PM Records

url = https://11pmrecords.bandcamp.com/album/ep-3


link:

label = Tape on Broken Skull Records

url = https://brokenskull.bandcamp.com/album/recall


-- synopsis

Hardcore punk with dbeats – Montréal, QC

-- synopsis


-- more


## Upcoming shows in Montreal


-- more
Great. OK, now you’re gonna change all the little bits of info in this file to make them relevant to your band, not mine! Some are self-explanatory and some are a bit less clear, so we’ll go through them one by one.
NOTE: If you are building more than a band page (e.g. a distro/label/collection) the information you put in this section should refer to your whole project! We will make a separate "artist manifest" later for each project. You can check out the Faircamp page for an example of how this should look.
title: your band name
base url: the url where your website is going to live eventually. This might be https://yourbandname.neocities.org or your custom domain name (recall.rocks).
language: Faircamp is translated into a bunch of languages! You can leave it ‘en’ for english, or see which other languages are supported and swap in the code. And if your preferred language isn’t listed or isn’t complete, maybe you can contribute a translation?
Home image: change the file name to match the cover image you put in this folder. Mine’s called recall_cover.jpg. Under description, just describe the image in a sentence or two, e.g. “a grainy black and white photo of a 5-piece punk band playing on stage.” This is for accessibility and helps visitors who use a screen reader know what’s on the page!
feeds: you can leave this as is. It generates a feed that people can use to follow your band if they’re using RSS. If you don’t know what any of that means, just don’t worry about it.
release_download_access: for now just set it to “free,” or “disabled” if you don’t want people to have the option to download your music (There are paywall/soft paycurtain options... I didn't have time to add them to the guide but you can check it out here).
release_downloads: make sure that only mp3 is listed (more files are supported by Faircamp, but Neocities doesn’t allow them so we’re sticking with mp3 for now).
Links: This is the place where you can put your links! For buying releases, merch, listening in other places, maybe some videos... whatever. For each link, “label” is what is shown on the page, and “url” is the website address. It’s great to include an email address here so people who aren’t on Instagram can contact you! Just like in the example, use mailto: [yourbandemail@provider.com]
Synopsis: This is the short text that appears at the top of the page. Make sure all the text is sandwiched in between the two “-- synopsis” tags! Keep it simple, Faircamp doesn't let you do any fancy formatting here.
More: This is the longer text at the bottom of the page, underneath the releases. You can leave this blank, or write your band’s manifesto, post info about your upcoming shows or tours, share more links, more photos... go wild. For anything beyond plain text, you can use markdown (a text formatting style which lets you do things like headers, links, and images). See if you can figure out how to do some of these things (like add a link) based on the sample text.
Theme: lets you change the colours on the page. Let’s leave this for now and you can mess around with it later if you want.
Hit “save” on that file and our catalog manifest is good to go.
In the “Demo 2024” folder, navigate to File > New File and create a new file called release.eno. Click to open it up and copy-paste in the following text:
title: Demo (2024)

permalink: demo-2024

date: 2024-03-01


release_artist: Recall


release_downloads:

- mp3


m3u: disabled

more_label: Liner Notes

track_numbering: arabic-dotted


cover:

description = distressed drawing of a small figure falling off a steep staircase into a stone-walled chasm

file = democover.jpg


-- synopsis

Demo cassette, self-released March 2024

-- synopsis


-- more

Recorded and mixed by Kelly at Hamspace in Montréal, February 2024

♥ Thank you Blair

Mastered by Papa Boom Bam Sam

Art by Taylor


All music by RECALL

Étienne - Guitar

Kelly - Bass

Misery - Vocals

Simon - Drums

Taylor - Guitar


## DIATRIBE / PRESSURE


[followed by lots and lots of lyrics...]

-- more
Similar to the last one, but a bit shorter – this time all the info will pertain to your first release. Let’s walk through it again.
Title: name of the release
Permalink: this is what goes on the end of the URL for linking directly to this specific release. You can make it whatever you want, but it’s standard practice to make it something like the name of the release separated by a dash (-). E.g., if your band website is recall.rocks and your first release is called “demo 2024”, you’d put demo-2024 in the permalink field, and then the full url for this release would be <https://recall.rocks/demo-2024/
Date: That’s the date the album was released, not today’s date. This is how the releases get displayed chronologically on the page.
More_label: this names the section at the bottom of the page “Liner Notes.” Keep it as-is for now, or change it to something else if you want.
Cover: Change the file name to correspond to your cover art file that’s in this release folder, and write a little image description for accessibility.
The Synopsis and More sections function the same as above – but this time they’re just for the release, so your “more” might be stuff like liner notes, lyrics, etc. Again, remember to ensure that all of your text is sandwiched in between the two “-- synopsis” or “-- more” tags!
Theme: Same as above, just leave it for now.
If you want, you can duplicate your release.eno file by right clicking and creating a copy, moving the copy to your second release folder, and renaming the file “release.eno”. Repeat the process of updating all the info for your second release, save it, and so on!
––
Tracks: It’s possible to create sub-folders inside release for every track, each with it’s own “track.eno” that can have particular info like lyrics and featured collaborators! More info here.
Label Mode: You can also use Faircamp to build a “label page” that features releases from multiple artists! But it can be used for more than just actual labels – you could make an archive of all of your own past/current projects, or a single page where someone could stumble on all of your friends’ bands in a particular town or corner of the scene. Here is more info in Faircamp's docs.
label_mode in your catalog.eno file
---
Terminal time!
First we gotta open a terminal – we're gonna open the terminal from inside our main faircamp page folder so all the stuff we type in will affect that folder:
cmd + enterfaircamp -pfaircamp.exe -p
If you notice something you want to change on your site (or if your site didn't build in the first place), you can go back into sublime text and edit your catalog.eno or release.eno files. Make sure you save any changes!
If your preview site is still running, you will have to type ctrl-c in your terminal to stop the preview and get your cursor back so you can type the next command.
To see your preview site again after making changes to your files, type faircamp -p again.
You will probably have to toggle back and forth between running faircamp -p to preview your site and ctrl-c to stop the preview a zillion times, as you tweak and fix small errors and make your site look the way you want it to.
faircamp --build-dir my-faircamp-site (or faircamp.exe --build-dir my-faircamp-site for windows) and hit enter.Go into your Neocities site’s dashboard and navitage to “edit site”. You’ll see a tan box with a few files in it.
Open your “faircamp build” folder (the one we just un-hid). Highlight to grab all the files inside of it and drag and drop them into the tan box.
Once everything is uploaded, at the top of the editor page, click on the red url of your site. The site should pop up in another window, looking how it looked in your preview. Congratulations, your site is live!
Make sure you save and backup the folders we've built! If you want to change your site in the future – either by updating the information in your .eno files or adding a new folder for a new release – you'll update these files, run faircamp preview, build the site, and re-upload your files to your hosting provider.
There's a lot more to say about this, but these are YOUR files. If it comes out that the CEO of Neocities is super invested in military tech and donating money to far-right politicians, you can pull your website off there and put it somewhere else!